| |
The Control
Panel allows you to manipulate RS Media as a 3D rendering, giving
you complete control when programming his movements. Sound, voice
or music files can be linked into the movements, creating funny
animations or your very own RS Media dance routine. |
 |
Click this button to return to Home page. |
 |
Click this button to minimize the current
window. |
 |
Click this button to return to the Editing
Suite title page. |
 |
Click this button to enter the Media
Organizer. |
 |
Click this button to enter the Personality
Editor.
|
 |
Click this button to enter the Editing
Suite help function. |
 |
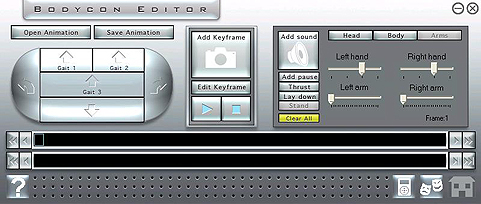
The controls on the left of the panel,
allow you to move RS Media forwards, backwards, or turn in
a variety of ways. |
 |
The panel on the right allows specific
parts of RS Media to be selected and maneuvered, sound and
songs to be added, and make him stand, sit, thrust, and pause. |
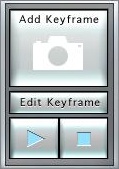 |
The Keyframe panel in the center records,
enters, or plays RS Media’s position. |
 |
The Timeline bars at the bottom
of the panel indicate how much approximate time it should take each BodyCon.
| Top Bar |
Movement Frames . |
| Bottom Bar |
Audio Frames . |
|
 |
Click this button to open a pre-programmed
animation. |
 |
Click this button to save the animation
you are currently editing. |
|
 |
 |
| |
Programming a
movement into the BodyCon Editor is simple.
Clicking ‘Add Keyframe’ records the position you have moved the 3D rendering
into (first position).
By repositioning RS Media and adding another keyframe
(second position), you are telling him to move from the first position,
to the second, in the shortest possible manner.
By repeating this procedure many times, a continuous
animated sequence can be programmed.
|
 |
Click this button after you have changed the robot’s position to add the movement
to the timeline. |
 |
Click this button once you have selected a movement to change. |
 |
Click this button to preview both sound and animation. |
 |
Click this button to stop both sound and animation. |
|
| You
will not need to click “Key Frame” for the following actions |
| |
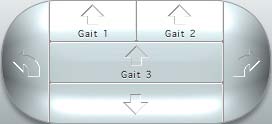
Gait 1 – RS Media will walk forward normally |
| |
Gait 2 – RS Media will walk forward, moving his hands from side to side |
| |
Gait 3 – RS Media will walk forward, moving his arms forward and back |
| |
[Left arrow] – RS Media turn right [to be confirmed] |
| |
[Right arrow] – RS Media will turn left |
| |
Thrust – RS Media’s hips move forward and back |
| |
Lay Down – RS Media will lean back and slide onto his back |
| |
Stand Up – when not standing, RS Media will get up |
|
| |
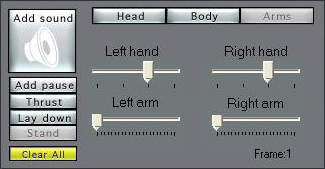
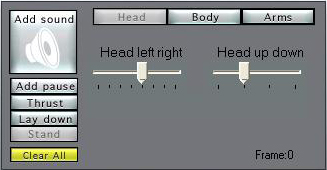
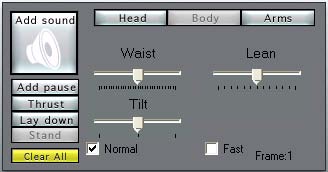
The Manipulation
Buttons allow precise control of RS Media’s head, body, and arms
(including hands). There is the ability to program a full sit or
stand movement as one step, perform a hip thrust, or a pause in his
movements.
Sound can be added to a routine in much the same way,
only the content can be taken from your PC in the form of a voice,
sound, or music file. RS Media can still move when files are loading. |
 |
Click this button to open a finder window and select a sound file
from your PC. |
 |
Click this button to create a half-second pause in RS Media’s movements. |
 |
Click this button to perform a hip thrust in a routine. |
 |
Click this button and RS Media will lay down as a step in a routine. |
 |
Click this button and RS Media will sit up as a step in a routine.
|
 |
Caution: Clicking this button will clear the BodyCon currently on
screen. |
 |
Use the sliders to turn the RS Media’s head up, down, and side to side
 |
 |
Use the sliders to tilt the RS Media’s torso side to side, rotate his waist, and
lean him forward and back.
 |
 |
Use the sliders to move the RS Media’s hands and arms
 |
|
| |
The Open Animation
Button gives you the ability to open any previously saved animation
for use in a new routine, to edit, or to retrieve whole sections
of movement to copy into another routine. |
 |
Click this button to open a finder window, selecting a previously saved animation
from your PC. |
|
| |
Clicking the Save
Animation Button will save everything you have programmed into the
BodyCon Editor. This will be saved as an animation with sound – known
as a BodyCon. This file can now be programmed into other routines
or placed in RS Media’s memory under any of the available BodyCon
function buttons in the Personality Editor. Now you can amaze your friends with your Robot
Programming skills, playing back files totally personalized and completely
unique.
|
|
Click this button to open a finder window, selecting a destination folder from
your PC to save the animation you are currently editing into. |
|
| |
Clicking the Directional
Control Buttons will move RS Media forward, backward, or turn left
or right. There are three forward walking gaits, each programmable
as one keyframe (the Keyframe button does not need to be pushed for
it to be added. See: Keyframe). All walks are the same speed but
have different arm movements. The backward walk is only one speed. |
|
|
| |
The TimeLine bars
are where you can see each of the Keyframes in your animated routine.
The timelines are split into two bars, the movement timeline and
the audio timeline.
The movement timeline can be programmed with a maximum
of 99 keyframes. When the Timeline bar is full, this is known as a 'page' (a fresh page will automatically open). The audio timeline can be programmed with a maximum
of 30 audio files.
To add a Keyframe you must click the keyframe button.
Some Keyframes are automatically added, including Gait 1, Gait 2,
Gait 3, [Left arrow], [Right arrow], Thrust, Lay Down, and Stand
Up (see: Keyframe)
To highlight a Keyframe in the timeline bar, either
click on the frame in the bar using your mouse or use the selection
buttons on either side of the bars to move left or right.
|
MOVEMENT TIMELINE
 |
Click this button to jump to the beginning of the movement TimeLine Bar. |
 |
Click this button to skip to the previous Keyframe on the movement TimeLine bar. |
 |
Click this button to jump to the end of the movement TimeLine Bar. |
 |
Click this button to skip to the next Keyframe on the movement TimeLine bar. |
AUDIO TIMELINE
|
|
|
 |
|
 |
| |
|
Use the sliders to move RS Media into a new position. |
|
Click the “Keyframe” button. |
|
The movement will be added to the timeline, as represented by a colored box. |
|
The width of the box is defined by the time of the movement. The more time the
moment takes, the wider the box will be. |
|
|
|
 |
|
 |
|
|
|
| |
|
Each movement, or Keyframe, will be represented by a box on the first timeline. |
|
The longer amount of time the movement takes, the longer the box will be. |
|
Select a Keyframe using the arrows on either side of the timeline. |
|
Use the sliders
to move RS Media into a new position. |
|
Hit the “Change Frame” button. |
|
|
|
|
|
|
|
|
|
|
| |
|
Hit the “Add Sound” button. |
|
Choose either *.mp3 or *.wav. |
|
The sound file will be added to the second timeline, which represents a soundtrack
for your BodyCons. |
|
Each sound file that you add will
be represented by a box the length of each box represents
the relative length of the sound file. |
|
|
|
|
|
|
|
|
|
|
| |
|
Click the “Open Animation” button. |
|
Navigate the browser window and select a BodyCon file.(*.bcn) |
|
|
|
|
|
|
|
|
|
|
| |
|
Click on “Save Animation”. |
|
Choose a permanent name and location on your computer to save the file as. |
|
Save the animation as a BodyCon file (*.bcn) |
|
|
|
|
|
|
|
|
|
|
| |
|
following: Select “Head” in the right-hand panel Move the slider for “Head left
right” to the right |
|
Select “Arms” in the right-hand panel Move the “Left arm”
slider to the right, to lift the arm |
|
Hit “Add Keyframe” |
|
Move the slider for “Left hand” to the left |
|
Hit “Add Keyframe” |
 |
Select the “Body” tab
Move the “Waist” slider
to the left, to turn RS Media
Move the “Left hand”
slider to the right |
|
Hit “Add Keyframe” |
|
Move the “Left hand” slider to the left |
|
Hit “Keyframe” to repeat steps to continue waving |
|
Press the Play button Click |
|
“Save Animation” and type in a file name |
|
|
|
|
|
|
|
|