E-mail for help RS Media Official Site
Programming Buttons

Overview

The Programming Buttons on the right of the Macro Editor screen can be split into two sections:

The first section allows you to open a fresh Macro sequence or one you created previously and saved, or save the current Macro sequence.


The second section allows you to create a Macro sequence of your choosing.


Navigation
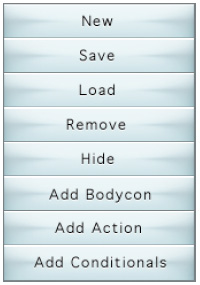
Click this button to start a new script. After opening the Macro Editor, a new script will be generated. You will automatically be given “Start Event” and “End Event” icons.

Click this button to save the script. A browser window will pop up to allow you to choose where to save it.
Click this button to load the Macro. A browser window will pop up to help you find your previously saved Macros. Choose a Macro by selecting a file and clicking ‘Open’ or pressing ‘Enter’.
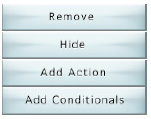
Click this button to remove an action, BodyCon, or conditional.
Click this button to hide the icons branching off from a particular object, in order to save space on the screen.

Hide
Click this button to add a BodyCon or a Macro file to the Macro. Select BodyCons or Macros from the browser window, which you can select by clicking ‘Open’ or pressing ‘Enter.’ You can also load BodyCons that you have created, which can be stored anywhere on your PC. [See: BodyCon Editor]

BodyCons
Macros
Click this button to add an action to the script. A browser window will pop up with a folder of possible actions, which you can select by clicking ‘Open’ or pressing ‘Enter.’
Action
Click this button to add a conditional. A browser window will pop up with a folder of possible conditionals, which you can select by clicking ‘Open’ or pressing ‘Enter.’

Conditional


NOTE: A conditional cannot be added to a conditional

Tip
 
  To play a voice file and display a photo at the same time, first use “Add Action” and select “Play An Audio File,” then add the “Show Picture” action AFTER the voice file on the timeline.


Programming Buttons

Overview

When you open a Macro, to add sound, music, a photo or video to a sequence, the Macro will be empty and will open the Select File button. By clicking the Select File button, a finder window will open and allow you to browse for the item you want in the Macro. When the appropriate file content has been chosen it will automatically link to the Macro.


Navigation

An example of using the Select File button would be when you have clicked on a Sound Macro from the Add BodyCon list. The Sound Macro will be empty, allowing you to click ‘Select File’, which will open a browser window. You can now search your files for the appropriate sound for your Sound Macro, and click Select. This sound is now linked to this Macro box. Whenever this Macro is opened, there is no need to search in Select File for a sound.


Number of Seconds Button

Overview

When a Macro is selected and its timing can be altered, a box will appear on the right of the Macro window. Use this box to determine the duration of the action.


Navigation
The Number of Seconds box will appear if the timing of a Macro can be altered, and if so, a time will be in the box. The time can be altered in one-second increments.

Click on the buttons to the right of the window indicating the time to increase (top button) or decrease the time (bottom button).


Tutorial Section

Number of Seconds Button Tutorials
 
 
To make a Macro
Click on “Start Event” so that it is highlighted
Choose “Add action” on the right-hand panel

Choose “Show_Picture.act” from the popup browser window

Click on the new photo icon you just created
Click “Select File” from below the right-hand panel

Navigate the pop-up window and choose a picture file from anywhere on your computer

Repeat the above steps for additional actions, BodyCons and conditionals

Click “Save,” and choose a location on your computer to save the Macro

Exit the Macro Editor, and use the Personality Editor to load the Macro as a BodyCon in the personality of your choice


E-mail for help RS Media Official Site