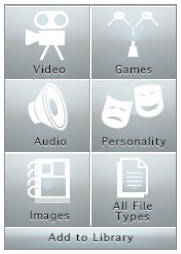
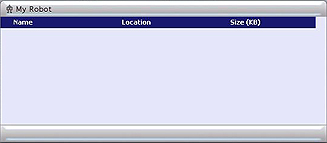
E-mail for help RS Media Official Site
Media Buttons

Overview
The Media Buttons open the specific file type stored within the Media Organizer and allow you to add files from your PC.

Navigation
Click this button to show only Video files (*.avi)
Click this button to show only Java Game files (*.jar)
Click this button to show only Audio files (*.wav, *.mp3)
Click this button to show only Personality files (*.per)
Click this button to show only Image files (*.jpg)
Click this button to show All File Types (all files)


Add to Library

Overview
To add a file onto RS Media it must first be found on your PC via the Media Organizer software. Add to Library allows you to search for files to enter into your Media Organizer library, which can then be transferred onto your RS Media via a USB connection or onto an SD card to be inserted into RS Media’s SD card slot. The SD card is essentially RS Media’s expanded memory and will bypass his onboard memory. See ‘My Robot’ for further details.

Navigation
Clicking the Add to Library button will open a window displaying all compatible files stored on your PC. You can now choose which files you wish to store in the Media Organizer, making them available for transfer onto RS Media. These files will be displayed in My Library.


My Library

Overview
The My Library window will display all files stored in the Media Organizer. By clicking one of the Media Buttons, the My Library window will now only display the selected file type.

Navigation
The My Library window will display the name of the file, the file format, and the file size. Should the My Library window contain more files than can be seen on one screen, there is a scroll function on the right hand side.

File selection Choose a file by clicking anywhere on the line and it will become
highlighted.
You can select a range of files by selecting the first file, then
holding the left click as you click the last file in a range.
You can also left click and drag over the files in the left hand bar.
You can select files divided by non-highlighted files by right clicking your file choice or by holding Ctrl and left click.
Adding files see Add to Library.
Deleting files Highlight the file to be removed and press your keyboard delete
button


My Robot

Overview
The My Robot window displays all the files stored on RS Media’s onboard memory or the SD card inserted in RS Media’s SD card slot. Connect RS Media to your PC and the Media Organizer will automatically detect, retrieve, and display all files.

RS Media’s internal memory has two sections: a default memory and an onboard memory. RS Media’s default memory cannot be altered and will not be displayed in the My Robot window. His onboard memory is specifically for file transfers in the absence of an SD card. The memory size is limited and may require regular content management and transfer in Media Organizer, should you create lots of files. An SD card is recommended to increase memory size and give you a greater RS Media experience. Should an SD card be present, the onboard memory will be ignored.


Navigation
The My Library window will display the name of the file, the file format, and the file size. Should the My Library window contain more files than can be seen on one screen, there is a scroll function on the right hand side.

File selection Choose a file by clicking anywhere on the line and it will become
highlighted.

You can select a range of files by selecting the first file, then
holding the Shift key as you click the last file in a range. The files
must be clicked in the left-hand bar.

By holding Ctrl you can check each file individually you wish to highlight. The files must be clicked in the left-hand bar.

Adding files To add a file to RS Media’s memory, select the file(s) to be transferred from My Library by highlighting it in the My Library window.

Click the Upload button Click the Download button


The file(s) will appear in the My Robot window and is now in RS
Media’s memory (transferred via USB or on the SD card to be
inserted into RS Media).

Deleting files To delete a file from RS Media’s memory, highlight the file(s) to
be removed and press your keyboard delete button. The file(s) is
no longer available in Media Organiser or on RS Media.
Transferring files Highlight the file(s) to be transferred to your PC.

Click the Download button


A browser window will appear and destination folder must be chosen. Once you have done this, click OK.

The file(s) will appear in the My Library window and is now in both the Media Organiser memory on your PC, and the RS Media memory.


File Preview

Overview

Media Organiser gives you the ability to preview Video, Audio, and Image files. By 
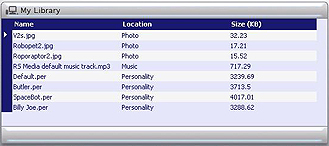
highlighting an individual file in either the My Library window or the My Robot window (and file preview is possible), click the Play button and an image will appear in the preview window. If a video or audio file is selected, it will begin playing.

If multiple files have been chosen, preview will not be possible.

To watch a video captured by RS Media on your PC, you must first install an mp4 codec if one is not already present on your computer. There are several of these available on the web for free download.


Navigation
If a Video (*.avi) file is selected, an image will appear in the preview window.
Nothing will be shown until the user clicks on the "play" button.
Clicking the Play button will start the video or audio files playing, or display a photo.
Clicking the Stop button will stop the video or audio files playing, or display a photo.


Export Personality

Overview
Export Personality is a function enabling you to export a personality easily and in its entirety by duplicating all linked files in a new folder.

Navigation
Export Click the Personality button or All File Types and select one or more personality files for export.

Click the Export Personality button and a browser window will open.

Choose the destination folder and click OK.

Each personality exported will appear in its own Personality folder.


Tutorial Section

Tutorials
Here are two examples of file transfer, both to and from RS Media. First connect RS Media to your PC via a USB cable or insert/connect an SD card. Now follow these examples:


MP3 into RS Media from PC
Open the Editing Suite and enter the Media Organizer:
 

Click the Audio or All File Types button to display MP3 files.

Select the file to be transferred from My Library by highlighting it in the My Library window.

The file can be previewed by clicking the Play button to start the audio file playing in the File Preview window.

If this is the file you want to transfer, click the Upload button.


The file will appear in the My Robot window and is now in RS Media’s memory transferred via USB or on the SD card to be inserted into RS Media

The file can now be played on RS Media. See ‘Folders Audio’ in the ‘Media Mode’ section of your RS Media User’s Manual.


Video from RS Media to your PC
Once you have taken a video using RS Media’s builtin video camera see ‘Folders- Video’ in the ‘Media Mode’ section of your RS Media User’s Manual, it can be easily saved onto your PC.

Open the Editing Suite and enter the Media Organizer:
  Click the Video or All File Types button to display .avi files.

Select the file to be transferred from My Robot by highlighting it in the My Robot window.

The file can be previewed by clicking the Play button to start the video file playing in the File Preview window.


If this is the file you want to transfer, click the Download button.


A browser window will appear and destination folder must be chosen. Once you have done this, click OK.

The file will appear in the My Library window and is now in the Media Organiser memory on your PC for future use.

The file can be previewed by clicking the Play button to start the video file playing in the File Preview window


E-mail for help RS Media Official Site